Search This Blog

Sunday, 27 May 2012

Knockomie update

Progress on Knockomie has been ongoing though you wouldn't think it to look at the layout. Plywood sheet has been bought and cut for the back and front panels and needs to be fitted when I have settled on the landscape I want. I have also been busy on some of the scenic features before fitting to the layout. Platforms have been built from the Peco range with Scalescene's platform faces and topping used and I still have to build the curved section which could be tricky. After these have been done and fitted the dreaded ballasting has to be tackled. At least I only have six feet of track to do.
Also in progress is a modified Bachmann Scenecraft Market Hampton station building, a bus shed inspired by the one that used to be at Garve and a few other bits and pieces. Lots of scenery items have been acquired like trees, Woodland Scenics rock moulds and  Smooth-it road making kit.
All I need now is time.

Trial fitting the platforms for clearance before glueing in place. The backscene panel can be seen  on the right.


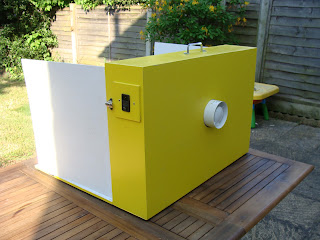
My new spray booth

One of the AMRC members made his own spray booth from plywood and an ordinary household extractor fan. I used it earlier this year for a Club open day to practise and demonstrate some weathering techniques with my airbrush and I was really impressed with it. One of the other members is a bit of a wizz with building baseboards and such and offered to make me a spray booth. After some dimensions noted from the Chinese blueprint (Paul's spray booth), a week later and £30 exchanged I am the proud owner of a very spacious new spray booth.
I had to do a bit of tinkering with the power socket as the one that was fitted was none standard. I bought a power lead and suitable socket from Maplin's and installed it on a blanking plate to replace the three pin socket that was fitted. We had some leftover yellow paint that my three year old daughter used on her picnic table to paint the outside of the booth with, which I think looks rather cool. My daughter also fitted the rubber feet to the base of the case and on the fold down front panel. The inside is painted in satin white and the whole booth has been varnished to seal it.


The internal work area is really spacious and could easily accommodate a large diesel locomotive in O gauge or  a large 1/72 scale plastic aircraft kit (one of my other interests). The only thing needed now is a length of hose and filter for the extractor and somewhere to use it. Oh, and a large O gauge loco to try out the booth. Anybody got a Class 37/47/50/55 in O gauge they want weathered?

Thursday, 3 May 2012

Name dropping

I suppose my new layout needs a name. Seeing as I have pinched elements from different locations in Scotland from the West Highlands, the Mallaig line and beyond I obviously need something suitably Scottish but totally distinct from any of the localities from which it is inspired by. I used to live in Forres, a lovely little town a few miles from the Moray coast, on a new housing development called Knockomie Rise - it's got a nice ring to it. But my layout is as flat as a pancake so Rise would probably be inappropriate - Knockomie it is then.

A change of scenery

Earlier in this blog I have mentioned a layout called Glasgow St. Mungo's. I moved house last summer and with it I realised that the layout was too big for the new Chez Shea residence so I sold it on ebay. Since then the frustration of not having a layout of my own to run my stock on has been countered by being able to use the Club layout for running and at the Annual Show last year. But this also has its limitations; the Club is in Andover  40 miles from my home and with the spiralling price of fuel a weekly trip to Andover is becoming prohibitive.

So what is the solution? Build another layout of course! I have spent some time over the winter laying floorboards in the loft to increase our storage space - three year old girls have a lot of toys and clothes - and found a length of MDF 6' x 17" up there amongst some other junk. After some time thinking of ideas for a layout on such a small baseboard area, Morar and Garve have always been up there, the March issue of Model Rail magazine dropped through my letter box with their annual Model Rail Scotland theme including an article on Ardlui for a small space layout.

I spent a few weeks researching Morar, Garve and Ardlui to see how I could replicate one of these locations in 6' x 17" - a "representation" could be achieved in this area with additional fiddle yards at either end. Track, points and additional timber was bought and the scenic baseboard is now complete.

The track plan features a single line into a station with a passing loop and short siding. The station itself is loosely based on Garve but I'm taking inspiration from Ardlui, Achnasheen and Morar. At the moment I haven't made the fiddle yards yet but at the end with the double track there is the scope to extend the station area and close the passing loop but that is for the future. For the time being the scenic area will go through a break at this end.

The track is laid and wired for DCC with the track weathered with a spray can of Railmatch frame dirt, my can of sleeper grime was empty and I didn't want to lose time getting some more but the effect is much the same. I painted the rail sides dark rust by brush paying attention to keeping the points clear and only on the viewing side. After painting I tested the track again for DCC but there was a bit of juddering over one section of the pointwork that needs a bit of cleaning.

I only had one problem when wiring the track for DCC and that was with the power to the points. After taking some advice from other club members and a bit of soldering they worked perfectly.

The next task is to build and install the platforms before ballasting can begin.

Trying out the track layout with a typical two coach train that will be operated.


The track after weathering and rail painting.

The DCC wiring under the base board. DCC is so much easier for a non electrician like me.


Thursday, 15 March 2012

Bachmann's new range brings mixed feelings

That's just typical!!!! I have waited for an age for a decent Class 101 in Strathclyde orange and black to be produced so started to build one from the DC kits range due to this lack of availabilty. Now and again the odd Lima model shows up on ebay for a kings ransom so it was with mixed feelings that I welcomed the proposed release by Hornby of the ex-Lima model in this striking livery. It puzzled me that Hornby took so long to produce this livery on the Class 101 given how popular Scottish railways are amongst the modelling world and that the limited edition Lima version can fetch upwards of £100 on ebay.
Mixed feelings because I was struggling with paint scheme and construction of the DC kits model and relieved that an affordable model will soon be in the shops so I can put this project away and move to something more pressing. But I was irritated because it means making a not so cheaply bought kit surplus to requirements. How many of us have bought a kit, started it and then put it to one side for months or even years?
This week Bachmann announced details of their latest catalogue including (you guessed it) a Class 101 in R-T-R OO gauge. I won't have such mixed feelings if they release a SPT liveried model this time - at least I won't have spent good money on a lower specification model in the meantime.

Wednesday, 7 March 2012

Signal box detailing

I've had some spare time while off work this week and decided to have a crack at detailing a Bachmann Scenecraft signal box I bought some time ago for another layout but I have since downsized my ambitions to something more manageable. This signal box will go on my new Scottish layout and needs a bit of tweaking to make it fit in more with its surroundings and to give it those personal additions that will make it unique.
Basically it is just a repaint of the window surrounds and guttering with the addition of cladding to change the horizontal planking to a narrower vertical style and a modification to the lamp room/toilet on the balcony.
Adding the cladding presents a problem that only became apparent after trialling the roof refit; the cladding makes the walls thicker of course so the roof bargeboards don't match up! A few thin strips of plasticard cured this.
The signal box before modification.

The first of the cladding panels is cut to size.

The new panels cut to size and ready for painting.

Add caption

The mismatch in the roof barge boards and walls are apparent here.

Plasticard strips cut to size for new barge boards.

Nearly finished. Just some nameplates and an interior to add.

I will do a detailed interior at a later stage but all that remains is for some nameboards and possibly a small lean to or bike rack under the stairs which are not the finest around.

Friday, 23 December 2011

Travels with my camera

My job takes me far and wide, usually all over Europe but occasionally I travel to Canada and the USA. I have been informed that I will probably have to make another trip to Tucson Arizona again next year. It is three years since my last visit and I remember that I took a couple of pictures while making the drive from Tucson to Flagstaff and onward to the Grand Canyon. Flagstaff was an interesting little town with plenty of railroad crossings and trains rumbling through which makes you realise why the hotels have packets of earplugs in each room for you because, by law, trains have to sound their horn at every crossing regardless of the time of day or night. And there are lots of crossings and dozens of trains each day!

The first four photo's were taken at the Grand Canyon and the rest on the road out of Tucson. The trains are immense - some I passed were quintuple headed. Others were top and tailed and some with a loco halfway along the train length. I clocked a stationary train at more than one mile long!

Tucson has a compact little model railway shop lodged in the Ace Hardware store on East 22nd Street. I bought an AC 4400 from there and a DCC chip. The shop staff couldn't fit the chip for me but suggested I visit the local Model Railway Club as one of their friends was quite well informed on the subject. Not only did I get a warm welcome but they fitted and programmed the chip for me on their club layout.


So I just got back from a two and a half week trip to the USA taking in Kentucky, North Carolina and Tucson Arizona. I had a great view of Tucson on the approach from my window seat on the plane. Tucson is a vast city with Davis-Monthan AFB right in the centre of town with its massive aircraft storage facility featuring hundreds if not thousands of stored aircraft from F-4 Phantoms, F-16's, B707's to dozens of C-130 Hercules and Starlifters.


I digress; also visible from the air was the massive Union Pacific freight yard also in the centre of town. This place has to be seen to be believed with trains being marshalled into mile long consists. Further north along the I-10 Interstate highway the line runs alongside the road with plenty of crossings and roadside access from the service road which is where the latest photo's were taken from.