Search This Blog

Monday 31 December 2012

Hornby Seacow's provide test piece

A new addition to my weathering palette is Abteilung's oil paints. I bought the rust shades and tried them out on this Hornby Seacow with very impressive results. I think that these oils will have a limited range of uses at the moment (at least until I gain more experience with them) for my rolling stock as they are quite clearly ideally suited to slab sided steel wagons. Maybe I can talk one of my AMRC colleagues to let me have a go at some of their American wagon stock.


The wagons had been weathered using Tamiya pigments already, the oils were used to create the rusty spots with staining streaking down from the sides. Just a small amount on a round brush or cocktail stick is enough for the smaller spots which are developed using a flat brush moistened with thinners in vertical streaks. I finished the effect with a light misting of track grime from an airbrush.

Knockomie locomotive progress

I've been working on three new loco's for use on Knockomie, a Class 24, Class 26 and Class 37. The Cl 24 and 26 are both in BR blue, the Cl 26 has been re-numbered to 26037 and also carries a Highland Stag logo from Inverness TMD from Fox Transfers. It's a little over size I think but from a distance it looks acceptable. Both have been weathered.
The Cl 37 is in Trainload Metals livery and is also weathered for use on Knockomie much later in the period that this layout can cover (1975-1992) and will go well with a short rake of Bachmann steel coil wagons that I have just finished weathering, along with a Dapol Tiphook covered steel wagon and various kit built steel carrying wagons I have either built or have planned. Weathering these loco's followed a standard method I use with pleasing results. 
I use Maskol on the windows then an airbrush to apply a light base colour of dirt on the underframes. For the 37 I sprayed around the recessed details on the body side before using a cotton bud to wipe off the excess in downward vertical strokes then added a final light misting to even up the grime layer. The roof and bonnets were done with Railmatch roof dirt with a blob of black added to the airbrush cup and then doing the sooty exhaust staining. After a couple of days for the paint to harden a little I used Tamiya pigments sets to highlight details on the bogies and roof with mud, dark rust, soot and oil stain colours. 
I had some excess track dirt paint mixture left over from the airbrush painting and used this as a wash on the cab fronts of the 24 and 26 then wiping away with a flat brush moistened with thinners to tone it down and get a nice streaky effect. I also tried out a new weathering product that I bought recently from www.snmstuff.co.uk, Abteilung weathering oils. Just a little dab on the cab front of 26037 then a flat brush with thinners used with vertical strokes leaves a very slight rust spot and streak - I'll try something a little closer to dirt or black on a future project though. 
Some final touches like scuffed dirt on the snowploughs from the couplings and on the cab doors from the driver kicking at the bottom corner to open sticky doors (apparently this is a common weathering mark). Final details will be the buffer beam details and to remove the masking.


26037 sits on the siding approaching the barrow crossing.
Side view of 26037.
Front view of 26037 featuring the weathering oils effects.
37514 sits in the siding at Knockomie.
37514's roof detail highlighted with Tamiya weathering pigments.

Saturday 20 October 2012

Knockomie update 5

The latest progress on Knockomie has seen a Dapol LMS starter signal installed, more work on the appearance of the dirt track in the siding and a platform shelter being fixed down.


Based on the Bachmann Scenecraft Shillingstone platform shelter I have modified Knockomie now has a new fixture. The Bachmann ready-to-plant shelter has been modified with a wriggly tin roof, poters & timetables, bumper strips and a lick of paint to the timber frames to match the Signal Box and Station House, etc. All suitably weathered with MIG pigments and washes. Other work to improve the realism of the muddy dirt road to the front of the layout along the siding has been achieved using Tamiya textured paint. The colour I chose was too sandy/ochre so I corrected this with some earth colours with lighter and darker tones for variety and I'm much happier with it.
Fencing has been fitted along the narrow platform and work on installing lights by Veissmann has begun.

Great moments in life

I experienced a great moment in life the other day. I am a very enthusiastic weatherer of my rolling stock and models, MIG productions being a current favourite brand. To date I have relied on mail order suppliers or the occasional opportunity to buy them when I stumble across a model shop that stocks them - usually in North America.
So it was one of those moments in life, like finding a fiver you forgot about in your back pocket, when I found a recently opened shop locally that sells, not just MIG products, but Vallejo, Tamiya and many more as well as tools, scenic material and other goodies. SnMstuff on Cove Road in Farnborough stock a wide range of the above mentioned products and at reasonable prices too so I'll be buying my weathering products from there from now. That's not to say that previous suppliers have been expensive or providing poor service - far from it. It's just that I'm a firm believer in buying local when possible. SnMstuff's shop is only open Thursday to Saturday with friendly and knowledgable service but they do mail order too with an easy to use website. www.snmstuff.co.uk
If you are ever in the Farnborough area when they are open they're worth a visit.

Saturday 11 August 2012

Knockomie update 4

I've been making some progress on the scenery on Knockomie recently with some very pleasing results. I bought a Woodlands Scenics rock face learner kit a few months ago and finally got to the point in Knockomie's construction where the time to try it out arrived.  I was a bit sceptical about achieving anything near the standard on the packet's illustration but by following the instructions I really surprised myself with how well it turned out. 
The rock face forms the scenic break feature at one end of the layout. The base for the plaster rock mouldings were made from polystyrene cut to shape and glued down with PVA. Making the mouldings is very straightforward and they are easily cut and filed to shape or size. Once moulded they are wetted and then matched with a strip of plaster cloth and fixed in place. It looks pretty unimpressive at this point and the look on my wife's face when she saw at this point proved the point to me. However, over the next couple of days after drying out, painting and then adding foliage and scatter material this underwhelming white lump in the corner of the layout metamorphoses into something quite realistic and I have to say spectacularly impressive.
If anyone is unsure of this product and whether they have the skills to achieve such realistic results then my advice is to put aside any such doubts and get stuck in. At around £11 for a learner kit it is fantastic value for money.


Thursday 2 August 2012

Andover Model Railway Club annual show 2012

The AMRC annual show takes place on the 1-2nd September 2012 at a new venue. More details can be found in the following link;  http://www.amrc.hampshire.org.uk/page7.html
Please come along if you can and see what we are all about.

Sunday 22 July 2012

Knockomie update 3

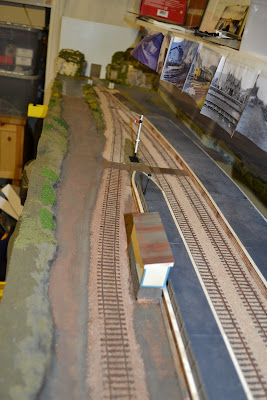
Lots of progress has been made on Knockomie over the last month. The roads have been done and painted with the markings and verges to finish off. The front of the layout has had some relief added using polystyrene cut with a hacksaw blade and covered with toilet roll sheets wetted with diluted PVA mix which gives a pretty effective looking rocky texture. Some further raised relief has been added between the mainline and the narrow side road to the siding. The backscene has also been added using the id backscenes range. I didn't want a truly mountainous Scottish backscene, rather an impression that this station lies somewhere in between so that a variety of Scottish liveried stock can be run. The scenic break panels at each end are next on the list of things to do.


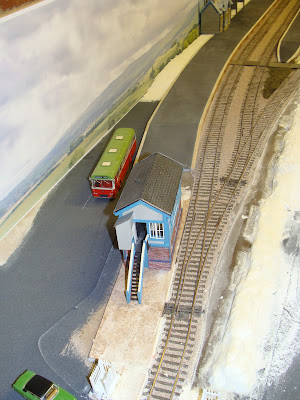
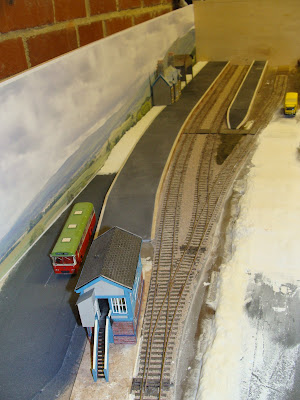
The road is done and the white stuff is the embankments made from polystyrene and loo roll. The signal box is not fixed in place yet. The scenic break will be formed with rocky outcrops and the track emerging from a cutting through the rock.


The relief I added to the front of the layout can be seen with some scenic material added - I got ahead of myself.


The general idea of the layout with the scenery and buildings can be seen here. None of the buildings have been fixed yet. The scenic break on the emd panel here will be a footbridge.

Wednesday 20 June 2012

Knockomie update 2

Knockomie was stored in the loft, a loft that gets very warm in the summer. Needless to say the baseboard bowed and all the platform decking paper peeled off so I have brought it back down to the garage and luckily it has returned to its original shape. The decking paper has been rejected as not being suitable and I have resorted to painting it instead.
The ballasting is complete and 75% of the platforms have been glued in place. I only have the curved section to complete with suitably cut and shaped decking material (plasticard). After some testing to make sure the clearances of the platform edging and ballast is good I can get into the scenery making.
So the platform is now completely laid. I had to make my own decking from plasticard for the curved section and it has been painted with Woodland Scenics tarmac and the coping stones picked out in slightly varied shades of light beige. Scalescenes stone effect platform edges have been used for the facings.
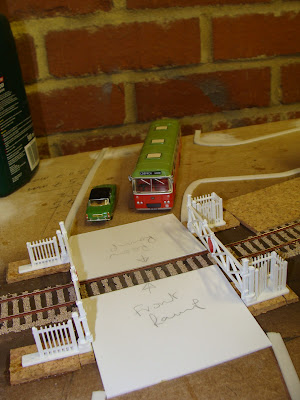
I have also been busy finishing the ballasting, fitting a barrow crossing, a level crossing and I have laid the road using Woodlands Scenics Smooth-it road kit. I still have to weather the ballast but by and large I am happy with it and the layout still operates as before.


The platforms shaped, fitted and with decking added. The coaches are to check the clearance.

The completed ballast and barrow crossing done. The signal box is not fixed at this time.

The level crossing is fitted. I used the vehicles to check for clearance and scale. 

The signal box gains its nameplate. The wonky window and interior will be dealt with at a later date and then the box will be permanently fitted.

On the Ho Chi Minh trail

I recently spent week in Vietnam on business and took some time out to find out what the Vietnamese railways were like, a bit dated is the honest answer. But I discovered that the railway runs all the way to China and eventually Beijing which suggests that the determined rail enthusiast could take a train all the way from Wick to Ho Chi Minh via the Chunnel and Trans-Siberian Express. 


Sunday 27 May 2012

Knockomie update

Progress on Knockomie has been ongoing though you wouldn't think it to look at the layout. Plywood sheet has been bought and cut for the back and front panels and needs to be fitted when I have settled on the landscape I want. I have also been busy on some of the scenic features before fitting to the layout. Platforms have been built from the Peco range with Scalescene's platform faces and topping used and I still have to build the curved section which could be tricky. After these have been done and fitted the dreaded ballasting has to be tackled. At least I only have six feet of track to do.
Also in progress is a modified Bachmann Scenecraft Market Hampton station building, a bus shed inspired by the one that used to be at Garve and a few other bits and pieces. Lots of scenery items have been acquired like trees, Woodland Scenics rock moulds and  Smooth-it road making kit.
All I need now is time.

Trial fitting the platforms for clearance before glueing in place. The backscene panel can be seen  on the right.


My new spray booth

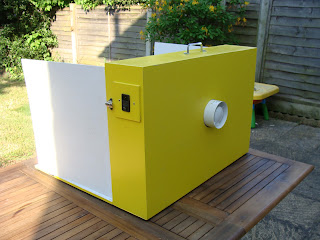
One of the AMRC members made his own spray booth from plywood and an ordinary household extractor fan. I used it earlier this year for a Club open day to practise and demonstrate some weathering techniques with my airbrush and I was really impressed with it. One of the other members is a bit of a wizz with building baseboards and such and offered to make me a spray booth. After some dimensions noted from the Chinese blueprint (Paul's spray booth), a week later and £30 exchanged I am the proud owner of a very spacious new spray booth.
I had to do a bit of tinkering with the power socket as the one that was fitted was none standard. I bought a power lead and suitable socket from Maplin's and installed it on a blanking plate to replace the three pin socket that was fitted. We had some leftover yellow paint that my three year old daughter used on her picnic table to paint the outside of the booth with, which I think looks rather cool. My daughter also fitted the rubber feet to the base of the case and on the fold down front panel. The inside is painted in satin white and the whole booth has been varnished to seal it.


The internal work area is really spacious and could easily accommodate a large diesel locomotive in O gauge or  a large 1/72 scale plastic aircraft kit (one of my other interests). The only thing needed now is a length of hose and filter for the extractor and somewhere to use it. Oh, and a large O gauge loco to try out the booth. Anybody got a Class 37/47/50/55 in O gauge they want weathered?

Thursday 3 May 2012

Name dropping

I suppose my new layout needs a name. Seeing as I have pinched elements from different locations in Scotland from the West Highlands, the Mallaig line and beyond I obviously need something suitably Scottish but totally distinct from any of the localities from which it is inspired by. I used to live in Forres, a lovely little town a few miles from the Moray coast, on a new housing development called Knockomie Rise - it's got a nice ring to it. But my layout is as flat as a pancake so Rise would probably be inappropriate - Knockomie it is then.

A change of scenery

Earlier in this blog I have mentioned a layout called Glasgow St. Mungo's. I moved house last summer and with it I realised that the layout was too big for the new Chez Shea residence so I sold it on ebay. Since then the frustration of not having a layout of my own to run my stock on has been countered by being able to use the Club layout for running and at the Annual Show last year. But this also has its limitations; the Club is in Andover  40 miles from my home and with the spiralling price of fuel a weekly trip to Andover is becoming prohibitive.

So what is the solution? Build another layout of course! I have spent some time over the winter laying floorboards in the loft to increase our storage space - three year old girls have a lot of toys and clothes - and found a length of MDF 6' x 17" up there amongst some other junk. After some time thinking of ideas for a layout on such a small baseboard area, Morar and Garve have always been up there, the March issue of Model Rail magazine dropped through my letter box with their annual Model Rail Scotland theme including an article on Ardlui for a small space layout.

I spent a few weeks researching Morar, Garve and Ardlui to see how I could replicate one of these locations in 6' x 17" - a "representation" could be achieved in this area with additional fiddle yards at either end. Track, points and additional timber was bought and the scenic baseboard is now complete.

The track plan features a single line into a station with a passing loop and short siding. The station itself is loosely based on Garve but I'm taking inspiration from Ardlui, Achnasheen and Morar. At the moment I haven't made the fiddle yards yet but at the end with the double track there is the scope to extend the station area and close the passing loop but that is for the future. For the time being the scenic area will go through a break at this end.

The track is laid and wired for DCC with the track weathered with a spray can of Railmatch frame dirt, my can of sleeper grime was empty and I didn't want to lose time getting some more but the effect is much the same. I painted the rail sides dark rust by brush paying attention to keeping the points clear and only on the viewing side. After painting I tested the track again for DCC but there was a bit of juddering over one section of the pointwork that needs a bit of cleaning.

I only had one problem when wiring the track for DCC and that was with the power to the points. After taking some advice from other club members and a bit of soldering they worked perfectly.

The next task is to build and install the platforms before ballasting can begin.

Trying out the track layout with a typical two coach train that will be operated.


The track after weathering and rail painting.

The DCC wiring under the base board. DCC is so much easier for a non electrician like me.


Thursday 15 March 2012

Bachmann's new range brings mixed feelings

That's just typical!!!! I have waited for an age for a decent Class 101 in Strathclyde orange and black to be produced so started to build one from the DC kits range due to this lack of availabilty. Now and again the odd Lima model shows up on ebay for a kings ransom so it was with mixed feelings that I welcomed the proposed release by Hornby of the ex-Lima model in this striking livery. It puzzled me that Hornby took so long to produce this livery on the Class 101 given how popular Scottish railways are amongst the modelling world and that the limited edition Lima version can fetch upwards of £100 on ebay.
Mixed feelings because I was struggling with paint scheme and construction of the DC kits model and relieved that an affordable model will soon be in the shops so I can put this project away and move to something more pressing. But I was irritated because it means making a not so cheaply bought kit surplus to requirements. How many of us have bought a kit, started it and then put it to one side for months or even years?
This week Bachmann announced details of their latest catalogue including (you guessed it) a Class 101 in R-T-R OO gauge. I won't have such mixed feelings if they release a SPT liveried model this time - at least I won't have spent good money on a lower specification model in the meantime.

Wednesday 7 March 2012

Signal box detailing

I've had some spare time while off work this week and decided to have a crack at detailing a Bachmann Scenecraft signal box I bought some time ago for another layout but I have since downsized my ambitions to something more manageable. This signal box will go on my new Scottish layout and needs a bit of tweaking to make it fit in more with its surroundings and to give it those personal additions that will make it unique.
Basically it is just a repaint of the window surrounds and guttering with the addition of cladding to change the horizontal planking to a narrower vertical style and a modification to the lamp room/toilet on the balcony.
Adding the cladding presents a problem that only became apparent after trialling the roof refit; the cladding makes the walls thicker of course so the roof bargeboards don't match up! A few thin strips of plasticard cured this.
The signal box before modification.

The first of the cladding panels is cut to size.

The new panels cut to size and ready for painting.

Add caption

The mismatch in the roof barge boards and walls are apparent here.

Plasticard strips cut to size for new barge boards.

Nearly finished. Just some nameplates and an interior to add.

I will do a detailed interior at a later stage but all that remains is for some nameboards and possibly a small lean to or bike rack under the stairs which are not the finest around.