Obviously I haven't been updating this blog for some time and with good reason - it's a pain in the arse to administer. This website has to be one of the least user friendly I have ever used. The support from Google is absolutely diabolical if you are trying to reset a forgotten password. The unhelpful guide asks for mobile phone numbers, I don't have one, and as an alternative asks for your email address then takes you no further. The help forum it suggests requires a login, yep, you guessed it - I can't access the forum without signing in which is the problem I need help with.
Eventually I remembered my password and tried to update my blog but now I can't upload pictures. So what now? I'll be looking for an alternative to googles blog service. In the meantime you can see some of my work here -
http://www.scale-models.co.uk User name is rickoshea52
And here -
http://www.ipms-farnborough.co.uk/gallery/key/Rick%20Shea
Saturday, 26 July 2014
Saturday, 23 February 2013
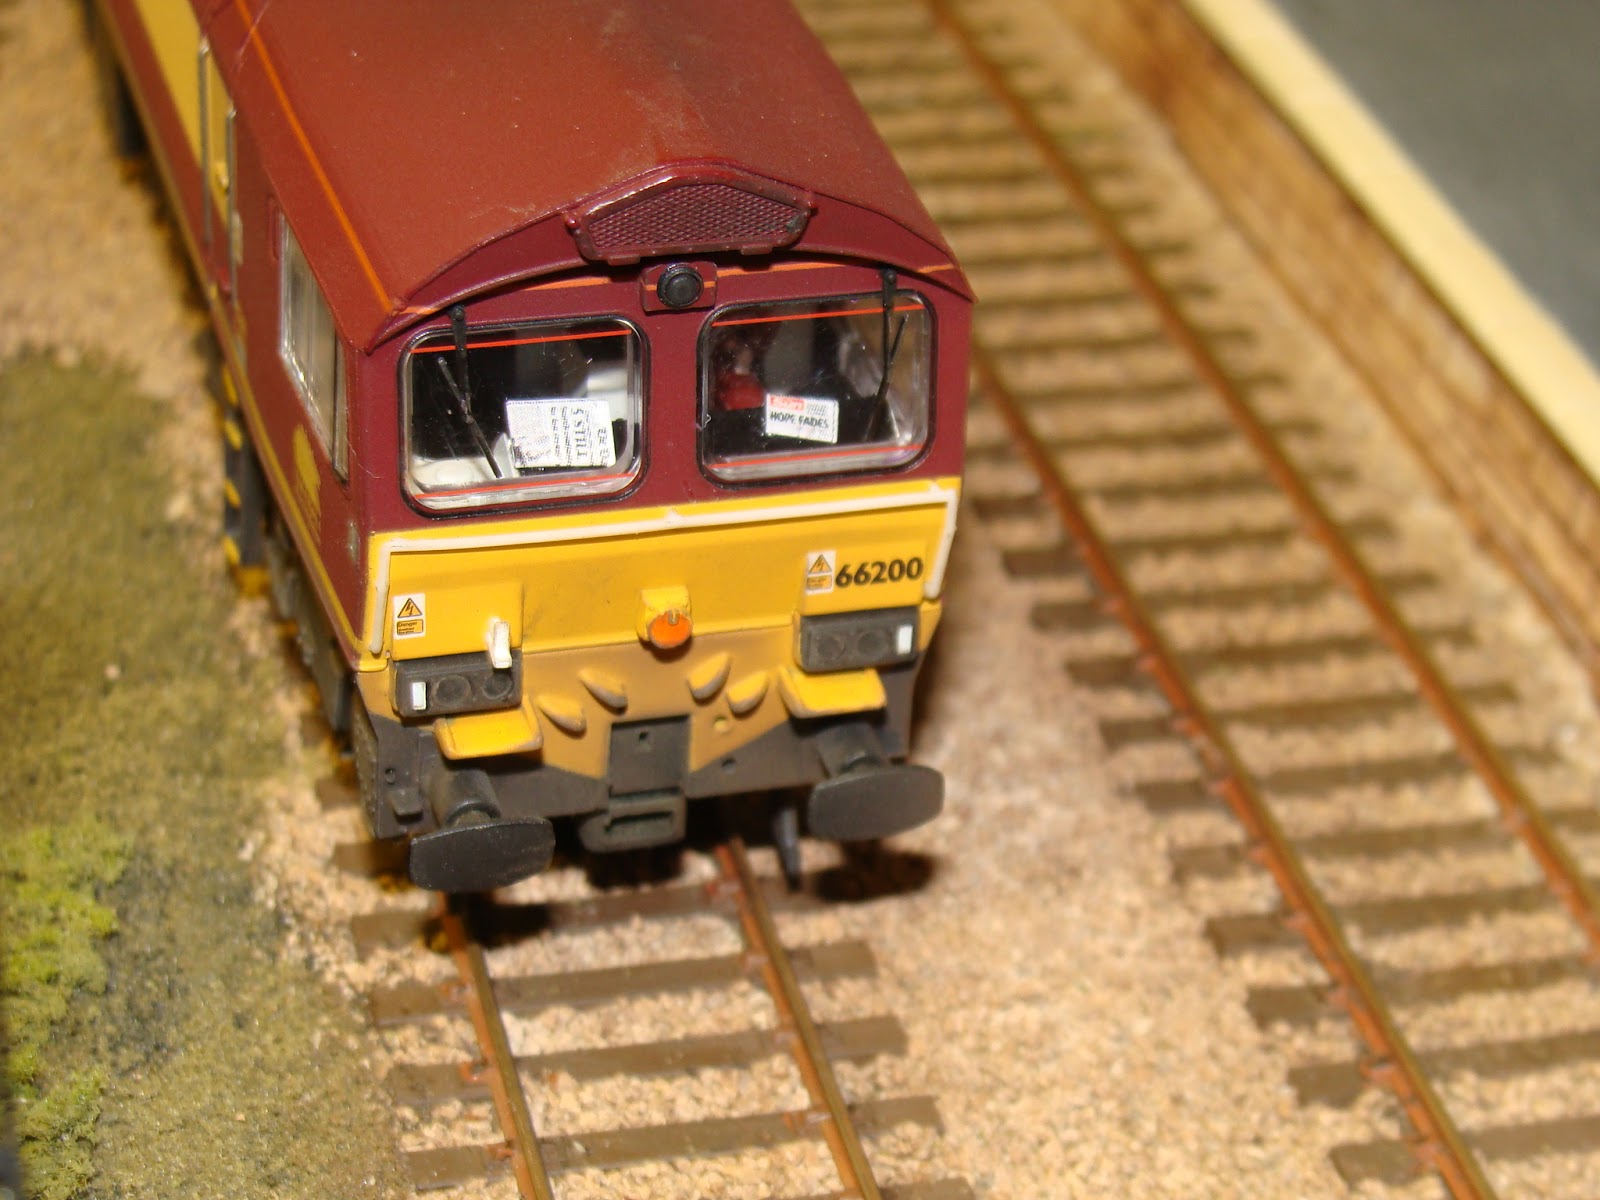
EWS class 66
One of the AMRC club members asked me to weather a class 66 in EWS livery for use on Redruth MRC Hoopers Aggregates layout at the 2013 Brighton Model Railway Show. Here are soem pictures with a more detailed article to follow.


Monday, 31 December 2012
Hornby Seacow's provide test piece
A new addition to my weathering palette is Abteilung's oil paints. I bought the rust shades and tried them out on this Hornby Seacow with very impressive results. I think that these oils will have a limited range of uses at the moment (at least until I gain more experience with them) for my rolling stock as they are quite clearly ideally suited to slab sided steel wagons. Maybe I can talk one of my AMRC colleagues to let me have a go at some of their American wagon stock.


The wagons had been weathered using Tamiya pigments already, the oils were used to create the rusty spots with staining streaking down from the sides. Just a small amount on a round brush or cocktail stick is enough for the smaller spots which are developed using a flat brush moistened with thinners in vertical streaks. I finished the effect with a light misting of track grime from an airbrush.
Knockomie locomotive progress
I've been working on three new loco's for use on Knockomie, a Class 24, Class 26 and Class 37. The Cl 24 and 26 are both in BR blue, the Cl 26 has been re-numbered to 26037 and also carries a Highland Stag logo from Inverness TMD from Fox Transfers. It's a little over size I think but from a distance it looks acceptable. Both have been weathered.
The Cl 37 is in Trainload Metals livery and is also weathered for use on Knockomie much later in the period that this layout can cover (1975-1992) and will go well with a short rake of Bachmann steel coil wagons that I have just finished weathering, along with a Dapol Tiphook covered steel wagon and various kit built steel carrying wagons I have either built or have planned. Weathering these loco's followed a standard method I use with pleasing results.
I use Maskol on the windows then an airbrush to apply a light base colour of dirt on the underframes. For the 37 I sprayed around the recessed details on the body side before using a cotton bud to wipe off the excess in downward vertical strokes then added a final light misting to even up the grime layer. The roof and bonnets were done with Railmatch roof dirt with a blob of black added to the airbrush cup and then doing the sooty exhaust staining. After a couple of days for the paint to harden a little I used Tamiya pigments sets to highlight details on the bogies and roof with mud, dark rust, soot and oil stain colours.
I had some excess track dirt paint mixture left over from the airbrush painting and used this as a wash on the cab fronts of the 24 and 26 then wiping away with a flat brush moistened with thinners to tone it down and get a nice streaky effect. I also tried out a new weathering product that I bought recently from www.snmstuff.co.uk, Abteilung weathering oils. Just a little dab on the cab front of 26037 then a flat brush with thinners used with vertical strokes leaves a very slight rust spot and streak - I'll try something a little closer to dirt or black on a future project though.
Some final touches like scuffed dirt on the snowploughs from the couplings and on the cab doors from the driver kicking at the bottom corner to open sticky doors (apparently this is a common weathering mark). Final details will be the buffer beam details and to remove the masking.
 |
| 26037 sits on the siding approaching the barrow crossing. |
 |
| Side view of 26037. |
 |
| Front view of 26037 featuring the weathering oils effects. |
 |
| 37514 sits in the siding at Knockomie. |
 |
| 37514's roof detail highlighted with Tamiya weathering pigments. |
Saturday, 20 October 2012
Knockomie update 5
The latest progress on Knockomie has seen a Dapol LMS starter signal installed, more work on the appearance of the dirt track in the siding and a platform shelter being fixed down.

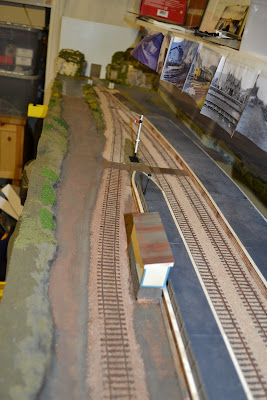

Based on the Bachmann Scenecraft Shillingstone platform shelter I have modified Knockomie now has a new fixture. The Bachmann ready-to-plant shelter has been modified with a wriggly tin roof, poters & timetables, bumper strips and a lick of paint to the timber frames to match the Signal Box and Station House, etc. All suitably weathered with MIG pigments and washes. Other work to improve the realism of the muddy dirt road to the front of the layout along the siding has been achieved using Tamiya textured paint. The colour I chose was too sandy/ochre so I corrected this with some earth colours with lighter and darker tones for variety and I'm much happier with it.
Fencing has been fitted along the narrow platform and work on installing lights by Veissmann has begun.


Fencing has been fitted along the narrow platform and work on installing lights by Veissmann has begun.
Great moments in life
I experienced a great moment in life the other day. I am a very enthusiastic weatherer of my rolling stock and models, MIG productions being a current favourite brand. To date I have relied on mail order suppliers or the occasional opportunity to buy them when I stumble across a model shop that stocks them - usually in North America.
So it was one of those moments in life, like finding a fiver you forgot about in your back pocket, when I found a recently opened shop locally that sells, not just MIG products, but Vallejo, Tamiya and many more as well as tools, scenic material and other goodies. SnMstuff on Cove Road in Farnborough stock a wide range of the above mentioned products and at reasonable prices too so I'll be buying my weathering products from there from now. That's not to say that previous suppliers have been expensive or providing poor service - far from it. It's just that I'm a firm believer in buying local when possible. SnMstuff's shop is only open Thursday to Saturday with friendly and knowledgable service but they do mail order too with an easy to use website. www.snmstuff.co.uk
If you are ever in the Farnborough area when they are open they're worth a visit.
Saturday, 11 August 2012
Knockomie update 4
I've been making some progress on the scenery on Knockomie recently with some very pleasing results. I bought a Woodlands Scenics rock face learner kit a few months ago and finally got to the point in Knockomie's construction where the time to try it out arrived. I was a bit sceptical about achieving anything near the standard on the packet's illustration but by following the instructions I really surprised myself with how well it turned out.
The rock face forms the scenic break feature at one end of the layout. The base for the plaster rock mouldings were made from polystyrene cut to shape and glued down with PVA. Making the mouldings is very straightforward and they are easily cut and filed to shape or size. Once moulded they are wetted and then matched with a strip of plaster cloth and fixed in place. It looks pretty unimpressive at this point and the look on my wife's face when she saw at this point proved the point to me. However, over the next couple of days after drying out, painting and then adding foliage and scatter material this underwhelming white lump in the corner of the layout metamorphoses into something quite realistic and I have to say spectacularly impressive.
If anyone is unsure of this product and whether they have the skills to achieve such realistic results then my advice is to put aside any such doubts and get stuck in. At around £11 for a learner kit it is fantastic value for money.


Subscribe to:
Comments (Atom)