Search This Blog

Friday, 23 December 2011

Travels with my camera

My job takes me far and wide, usually all over Europe but occasionally I travel to Canada and the USA. I have been informed that I will probably have to make another trip to Tucson Arizona again next year. It is three years since my last visit and I remember that I took a couple of pictures while making the drive from Tucson to Flagstaff and onward to the Grand Canyon. Flagstaff was an interesting little town with plenty of railroad crossings and trains rumbling through which makes you realise why the hotels have packets of earplugs in each room for you because, by law, trains have to sound their horn at every crossing regardless of the time of day or night. And there are lots of crossings and dozens of trains each day!

The first four photo's were taken at the Grand Canyon and the rest on the road out of Tucson. The trains are immense - some I passed were quintuple headed. Others were top and tailed and some with a loco halfway along the train length. I clocked a stationary train at more than one mile long!

Tucson has a compact little model railway shop lodged in the Ace Hardware store on East 22nd Street. I bought an AC 4400 from there and a DCC chip. The shop staff couldn't fit the chip for me but suggested I visit the local Model Railway Club as one of their friends was quite well informed on the subject. Not only did I get a warm welcome but they fitted and programmed the chip for me on their club layout.


So I just got back from a two and a half week trip to the USA taking in Kentucky, North Carolina and Tucson Arizona. I had a great view of Tucson on the approach from my window seat on the plane. Tucson is a vast city with Davis-Monthan AFB right in the centre of town with its massive aircraft storage facility featuring hundreds if not thousands of stored aircraft from F-4 Phantoms, F-16's, B707's to dozens of C-130 Hercules and Starlifters.


I digress; also visible from the air was the massive Union Pacific freight yard also in the centre of town. This place has to be seen to be believed with trains being marshalled into mile long consists. Further north along the I-10 Interstate highway the line runs alongside the road with plenty of crossings and roadside access from the service road which is where the latest photo's were taken from.


Pre-Christmas shopping

I went Christmas shopping today in Liverpool fell onto a bus and ended up on Smithdown Road. So seeing as I was there I visited Hattons and bought yet another Class 37, in Railfreight Metal livery, and the three pack of Hornby Trout hoppers. I will have to feign surprise when I unwrap them on Sunday.

They will all be another addition to the weathering workshop when I get home.

Thank you to all who have visited my blog this year.

Merry Christmas to you all.

Saturday, 10 December 2011

Ricky's stock gets a run out

Time has been against me these last few weeks with lots of travel away from home, college study and of course family life. Although I have been doing the odd bit of modelling here and there I just haven't had time to photograph and blog about it.
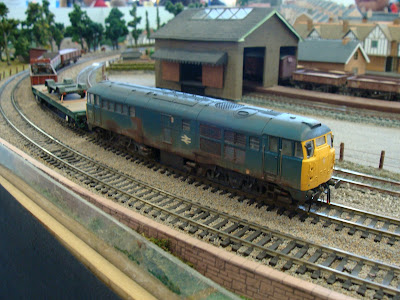
However, I took some photo's of my stock running on New Barton, the AMRC OO gauge layout, at their annual show in September. It was really pleasing to see a whole load of my weathered stock running on a layout and hear the favourable and kind comments from visitors and Club members.
Take a look and see what you think.


Saturday, 8 October 2011

Heljan O Gauge Hymek

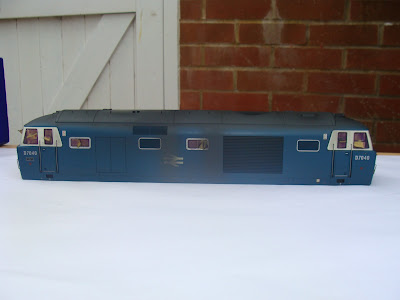
One of the AMRC club members has asked me to weather his O gauge Hymek from Heljan. It suffered an accident during running and was derailed. The result was some scuffed paintwork and a few broken appendages. Hopefully the weathering will hide the scuffs.

First thing to do was split the body from the chassis to make masking and painting easier. All of the glazing was masked with tape and maskol inside and out. I removed the headcode glazing and masked up all of the electronic gubbins inside the body and also on the chassis. I removed the buffers too.

The first coat was with Railmatch Sleeper Grime enamel paint. This gives a good base from which to add different shades and colours later. The roof was treated to Railmatch Roof Dirt. From the photos I could find of this locomotive the roof seems to get really filthy all over but I didn't want to over do it here - it's a weathering job and not a respray after all.

Once I was happy with the roof I used the same mix on the chassis again but in more localized areas on the bogies and streaks on the fuel tank. This is as far as I go for now on the chassis; I will return to it later after the first coats of paint have dried thoroughly.

I added some Railmatch Black to the mix and returned to the roof and sprayed around the exhausts and surrounding panel and also along the roof panel joints to give a bit of relief. Again, I will let the roof dry thoroughly before doing more here.

There is still lots to do but the bulk of the airbrushing has been completed.

The chassis and underframe are finished now with various weathering techniques applied (photo's to follow). I have applied MiG weathering pigments to give the impression of dirt and grime build up in the recesses of the bogies, etc. Tensocrom acrylics were also applied to replicate oily stains and streaks on the bogies, axle boxes and fuel tank. A touch of highlighting with Tamiya weathering pallets on the foot steps and over the raised detail of the bogies was the final touch.

The body has also been progressed with track coloured dirt applied to the body sides and with the addirion of a drop of black this was darkened for very localised spots of dirt on the sides and across the fronts to appear as dead bugs and other dirt.

The final touches to this will be some Tensocrom acrylics to mimic oil and damp dirt and grime deposits along the body panel seams and door recesses.

At last I can post some photo's of the finished article. With the body and chassis reunited the true effect of the weathering can be appreciated. When I was first asked to do this task I was an bit reluctant and uncertain about the outcome but now that I have seen the finished model I quite fancy the idea of doing another O gauge locomotive , maybe something a bit bigger like a Class 37, 47 or 50.

I hope anyone reading  this article find it of interest. I'd be pleased to hear any feedback or comments you may have.


The finished article


I think the underframe really comes to life with the weathering techniques I picked up from Model Rail magazine's  feature on weathering a Class 26 last summer.


Using an airbrush to weather models in this scale is so much easier.


MIG weathering pigments and Tensocrom opaque acrylics just add that little bit of authenticity.


Thursday, 29 September 2011

Got a new airbrush

I'm in the USA for two weeks on business and took some time out to visit a hobby shop in St. Charles Missouri, a neighbouring district of St. Louis. Mark Twain Hobbies have a wide range of modelling goodies for radio controlled cars, boats and planes to plastic kits and rail road supplies.
I was looking at all of the US railroading stock and contemplating buying another loco' when I wandered into the tooling section and struck gold - an Iwata Eclipse HP-CS airbrush for $128 - about £81. The UK RRP is about £137!---------------Sold to the Limey.

I can't wait to get home and try it out before I do a bit of weathering on two O guage loco's some of the AMRC members have asked me to weather for them.

Sunday, 21 August 2011

Some more examples of my weathering


Weathered Rudd and SAA wagons

I had another afternoon of weathering today and tried something new. I had a small bottle of weathering powder that I bought years ago in Toulouse but never really got to grips with. I had airbrush weathered a Hornby Rudd wagon in Dutch livery and a Bachmann SAA scrap wagon but they needed a little bit more to give them more texture and authenticity - rust!
The powder is a dark rust shade and applies well either as a dry powder or mixed with acrylic thinners and painted on. According to the label it can also be airbrushed. For the Rudd though I used it dry and it adhered well to the airbrush applied weathering giving quited a realistic shade and texture that can be varied with the amount of powder applied.
With the SAA wagon I needed to mix it into a wash so that the recesses of the individual panels would be covered before rubbing the excess off with a cotton bud - lots of cotton buds! I used the dry powder after this to tone down the wagon's original livery.


The inside of the wagon was weathered previously with Scenic Rust but I am still in two minds about the finish produced with this product. Here I used the the dry powder application again and it seems to have improved the look. A final brush down all over with an old toothbrush removed any excess weathering powder.

Wednesday, 3 August 2011

Slovenske železnice, SŽ

I got back from Ljubljana last week and spent an afternoon drinking beer at the the Station Bar.

Ljubljana Railway Station


There is also a Railway Museum in the former roundhouse depot not far from the town centre and a bit tricky to find but worth the effort.