That's just typical!!!! I have waited for an age for a decent Class 101 in Strathclyde orange and black to be produced so started to build one from the DC kits range due to this lack of availabilty. Now and again the odd Lima model shows up on ebay for a kings ransom so it was with mixed feelings that I welcomed the proposed release by Hornby of the ex-Lima model in this striking livery. It puzzled me that Hornby took so long to produce this livery on the Class 101 given how popular Scottish railways are amongst the modelling world and that the limited edition Lima version can fetch upwards of £100 on ebay.
Mixed feelings because I was struggling with paint scheme and construction of the DC kits model and relieved that an affordable model will soon be in the shops so I can put this project away and move to something more pressing. But I was irritated because it means making a not so cheaply bought kit surplus to requirements. How many of us have bought a kit, started it and then put it to one side for months or even years?
This week Bachmann announced details of their latest catalogue including (you guessed it) a Class 101 in R-T-R OO gauge. I won't have such mixed feelings if they release a SPT liveried model this time - at least I won't have spent good money on a lower specification model in the meantime.
Thursday, 15 March 2012

Wednesday, 7 March 2012
Signal box detailing
I've had some spare time while off work this week and decided to have a crack at detailing a Bachmann Scenecraft signal box I bought some time ago for another layout but I have since downsized my ambitions to something more manageable. This signal box will go on my new Scottish layout and needs a bit of tweaking to make it fit in more with its surroundings and to give it those personal additions that will make it unique.
Basically it is just a repaint of the window surrounds and guttering with the addition of cladding to change the horizontal planking to a narrower vertical style and a modification to the lamp room/toilet on the balcony.
Adding the cladding presents a problem that only became apparent after trialling the roof refit; the cladding makes the walls thicker of course so the roof bargeboards don't match up! A few thin strips of plasticard cured this.
I will do a detailed interior at a later stage but all that remains is for some nameboards and possibly a small lean to or bike rack under the stairs which are not the finest around.
Basically it is just a repaint of the window surrounds and guttering with the addition of cladding to change the horizontal planking to a narrower vertical style and a modification to the lamp room/toilet on the balcony.
Adding the cladding presents a problem that only became apparent after trialling the roof refit; the cladding makes the walls thicker of course so the roof bargeboards don't match up! A few thin strips of plasticard cured this.
 |
| The signal box before modification. |
 |
| The first of the cladding panels is cut to size. |
 |
| The new panels cut to size and ready for painting. |
 |
| Add caption |
 |
| The mismatch in the roof barge boards and walls are apparent here. |
 |
| Plasticard strips cut to size for new barge boards. |
 |
| Nearly finished. Just some nameplates and an interior to add. |
Friday, 23 December 2011
Travels with my camera
My job takes me far and wide, usually all over Europe but occasionally I travel to Canada and the USA. I have been informed that I will probably have to make another trip to Tucson Arizona again next year. It is three years since my last visit and I remember that I took a couple of pictures while making the drive from Tucson to Flagstaff and onward to the Grand Canyon. Flagstaff was an interesting little town with plenty of railroad crossings and trains rumbling through which makes you realise why the hotels have packets of earplugs in each room for you because, by law, trains have to sound their horn at every crossing regardless of the time of day or night. And there are lots of crossings and dozens of trains each day!
The first four photo's were taken at the Grand Canyon and the rest on the road out of Tucson. The trains are immense - some I passed were quintuple headed. Others were top and tailed and some with a loco halfway along the train length. I clocked a stationary train at more than one mile long!
Tucson has a compact little model railway shop lodged in the Ace Hardware store on East 22nd Street. I bought an AC 4400 from there and a DCC chip. The shop staff couldn't fit the chip for me but suggested I visit the local Model Railway Club as one of their friends was quite well informed on the subject. Not only did I get a warm welcome but they fitted and programmed the chip for me on their club layout.


So I just got back from a two and a half week trip to the USA taking in Kentucky, North Carolina and Tucson Arizona. I had a great view of Tucson on the approach from my window seat on the plane. Tucson is a vast city with Davis-Monthan AFB right in the centre of town with its massive aircraft storage facility featuring hundreds if not thousands of stored aircraft from F-4 Phantoms, F-16's, B707's to dozens of C-130 Hercules and Starlifters.


I digress; also visible from the air was the massive Union Pacific freight yard also in the centre of town. This place has to be seen to be believed with trains being marshalled into mile long consists. Further north along the I-10 Interstate highway the line runs alongside the road with plenty of crossings and roadside access from the service road which is where the latest photo's were taken from.
Pre-Christmas shopping
I went Christmas shopping today in Liverpool fell onto a bus and ended up on Smithdown Road. So seeing as I was there I visited Hattons and bought yet another Class 37, in Railfreight Metal livery, and the three pack of Hornby Trout hoppers. I will have to feign surprise when I unwrap them on Sunday.
They will all be another addition to the weathering workshop when I get home.
Thank you to all who have visited my blog this year.
Merry Christmas to you all.
They will all be another addition to the weathering workshop when I get home.
Thank you to all who have visited my blog this year.
Merry Christmas to you all.
Saturday, 10 December 2011
Ricky's stock gets a run out
Time has been against me these last few weeks with lots of travel away from home, college study and of course family life. Although I have been doing the odd bit of modelling here and there I just haven't had time to photograph and blog about it.
However, I took some photo's of my stock running on New Barton, the AMRC OO gauge layout, at their annual show in September. It was really pleasing to see a whole load of my weathered stock running on a layout and hear the favourable and kind comments from visitors and Club members.
Take a look and see what you think.
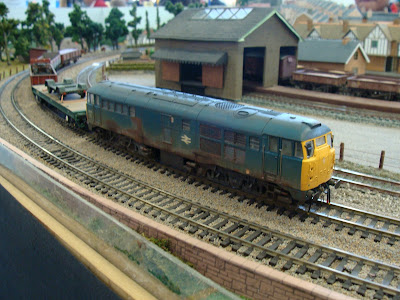


However, I took some photo's of my stock running on New Barton, the AMRC OO gauge layout, at their annual show in September. It was really pleasing to see a whole load of my weathered stock running on a layout and hear the favourable and kind comments from visitors and Club members.
Take a look and see what you think.


Saturday, 8 October 2011
Heljan O Gauge Hymek
One of the AMRC club members has asked me to weather his O gauge Hymek from Heljan. It suffered an accident during running and was derailed. The result was some scuffed paintwork and a few broken appendages. Hopefully the weathering will hide the scuffs.
First thing to do was split the body from the chassis to make masking and painting easier. All of the glazing was masked with tape and maskol inside and out. I removed the headcode glazing and masked up all of the electronic gubbins inside the body and also on the chassis. I removed the buffers too.
The first coat was with Railmatch Sleeper Grime enamel paint. This gives a good base from which to add different shades and colours later. The roof was treated to Railmatch Roof Dirt. From the photos I could find of this locomotive the roof seems to get really filthy all over but I didn't want to over do it here - it's a weathering job and not a respray after all.
Once I was happy with the roof I used the same mix on the chassis again but in more localized areas on the bogies and streaks on the fuel tank. This is as far as I go for now on the chassis; I will return to it later after the first coats of paint have dried thoroughly.
I added some Railmatch Black to the mix and returned to the roof and sprayed around the exhausts and surrounding panel and also along the roof panel joints to give a bit of relief. Again, I will let the roof dry thoroughly before doing more here.
There is still lots to do but the bulk of the airbrushing has been completed.
The chassis and underframe are finished now with various weathering techniques applied (photo's to follow). I have applied MiG weathering pigments to give the impression of dirt and grime build up in the recesses of the bogies, etc. Tensocrom acrylics were also applied to replicate oily stains and streaks on the bogies, axle boxes and fuel tank. A touch of highlighting with Tamiya weathering pallets on the foot steps and over the raised detail of the bogies was the final touch.
The body has also been progressed with track coloured dirt applied to the body sides and with the addirion of a drop of black this was darkened for very localised spots of dirt on the sides and across the fronts to appear as dead bugs and other dirt.
The final touches to this will be some Tensocrom acrylics to mimic oil and damp dirt and grime deposits along the body panel seams and door recesses.
At last I can post some photo's of the finished article. With the body and chassis reunited the true effect of the weathering can be appreciated. When I was first asked to do this task I was an bit reluctant and uncertain about the outcome but now that I have seen the finished model I quite fancy the idea of doing another O gauge locomotive , maybe something a bit bigger like a Class 37, 47 or 50.
I hope anyone reading this article find it of interest. I'd be pleased to hear any feedback or comments you may have.


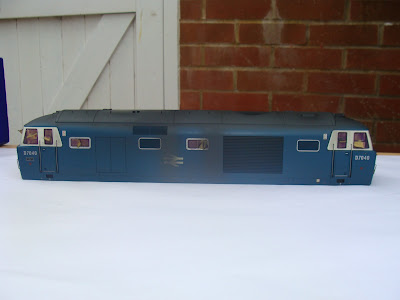


First thing to do was split the body from the chassis to make masking and painting easier. All of the glazing was masked with tape and maskol inside and out. I removed the headcode glazing and masked up all of the electronic gubbins inside the body and also on the chassis. I removed the buffers too.
The first coat was with Railmatch Sleeper Grime enamel paint. This gives a good base from which to add different shades and colours later. The roof was treated to Railmatch Roof Dirt. From the photos I could find of this locomotive the roof seems to get really filthy all over but I didn't want to over do it here - it's a weathering job and not a respray after all.
Once I was happy with the roof I used the same mix on the chassis again but in more localized areas on the bogies and streaks on the fuel tank. This is as far as I go for now on the chassis; I will return to it later after the first coats of paint have dried thoroughly.
I added some Railmatch Black to the mix and returned to the roof and sprayed around the exhausts and surrounding panel and also along the roof panel joints to give a bit of relief. Again, I will let the roof dry thoroughly before doing more here.
There is still lots to do but the bulk of the airbrushing has been completed.
The chassis and underframe are finished now with various weathering techniques applied (photo's to follow). I have applied MiG weathering pigments to give the impression of dirt and grime build up in the recesses of the bogies, etc. Tensocrom acrylics were also applied to replicate oily stains and streaks on the bogies, axle boxes and fuel tank. A touch of highlighting with Tamiya weathering pallets on the foot steps and over the raised detail of the bogies was the final touch.
The body has also been progressed with track coloured dirt applied to the body sides and with the addirion of a drop of black this was darkened for very localised spots of dirt on the sides and across the fronts to appear as dead bugs and other dirt.
The final touches to this will be some Tensocrom acrylics to mimic oil and damp dirt and grime deposits along the body panel seams and door recesses.
At last I can post some photo's of the finished article. With the body and chassis reunited the true effect of the weathering can be appreciated. When I was first asked to do this task I was an bit reluctant and uncertain about the outcome but now that I have seen the finished model I quite fancy the idea of doing another O gauge locomotive , maybe something a bit bigger like a Class 37, 47 or 50.
I hope anyone reading this article find it of interest. I'd be pleased to hear any feedback or comments you may have.


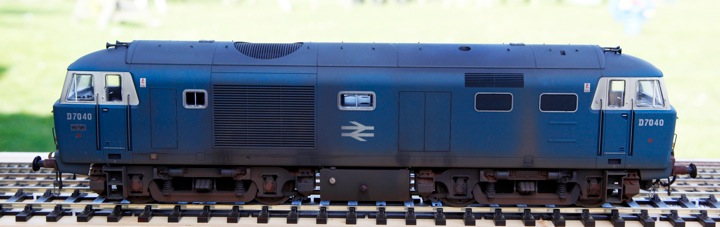 |
| The finished article |
 |
| I think the underframe really comes to life with the weathering techniques I picked up from Model Rail magazine's feature on weathering a Class 26 last summer. |
 |
| Using an airbrush to weather models in this scale is so much easier. |
 |
| MIG weathering pigments and Tensocrom opaque acrylics just add that little bit of authenticity. |

Thursday, 29 September 2011
Got a new airbrush
I'm in the USA for two weeks on business and took some time out to visit a hobby shop in St. Charles Missouri, a neighbouring district of St. Louis. Mark Twain Hobbies have a wide range of modelling goodies for radio controlled cars, boats and planes to plastic kits and rail road supplies.
I was looking at all of the US railroading stock and contemplating buying another loco' when I wandered into the tooling section and struck gold - an Iwata Eclipse HP-CS airbrush for $128 - about £81. The UK RRP is about £137!---------------Sold to the Limey.
I can't wait to get home and try it out before I do a bit of weathering on two O guage loco's some of the AMRC members have asked me to weather for them.
Subscribe to:
Posts (Atom)