First thing to do was split the body from the chassis to make masking and painting easier. All of the glazing was masked with tape and maskol inside and out. I removed the headcode glazing and masked up all of the electronic gubbins inside the body and also on the chassis. I removed the buffers too.
The first coat was with Railmatch Sleeper Grime enamel paint. This gives a good base from which to add different shades and colours later. The roof was treated to Railmatch Roof Dirt. From the photos I could find of this locomotive the roof seems to get really filthy all over but I didn't want to over do it here - it's a weathering job and not a respray after all.
Once I was happy with the roof I used the same mix on the chassis again but in more localized areas on the bogies and streaks on the fuel tank. This is as far as I go for now on the chassis; I will return to it later after the first coats of paint have dried thoroughly.
I added some Railmatch Black to the mix and returned to the roof and sprayed around the exhausts and surrounding panel and also along the roof panel joints to give a bit of relief. Again, I will let the roof dry thoroughly before doing more here.
There is still lots to do but the bulk of the airbrushing has been completed.
The chassis and underframe are finished now with various weathering techniques applied (photo's to follow). I have applied MiG weathering pigments to give the impression of dirt and grime build up in the recesses of the bogies, etc. Tensocrom acrylics were also applied to replicate oily stains and streaks on the bogies, axle boxes and fuel tank. A touch of highlighting with Tamiya weathering pallets on the foot steps and over the raised detail of the bogies was the final touch.
The body has also been progressed with track coloured dirt applied to the body sides and with the addirion of a drop of black this was darkened for very localised spots of dirt on the sides and across the fronts to appear as dead bugs and other dirt.
The final touches to this will be some Tensocrom acrylics to mimic oil and damp dirt and grime deposits along the body panel seams and door recesses.
At last I can post some photo's of the finished article. With the body and chassis reunited the true effect of the weathering can be appreciated. When I was first asked to do this task I was an bit reluctant and uncertain about the outcome but now that I have seen the finished model I quite fancy the idea of doing another O gauge locomotive , maybe something a bit bigger like a Class 37, 47 or 50.
I hope anyone reading this article find it of interest. I'd be pleased to hear any feedback or comments you may have.


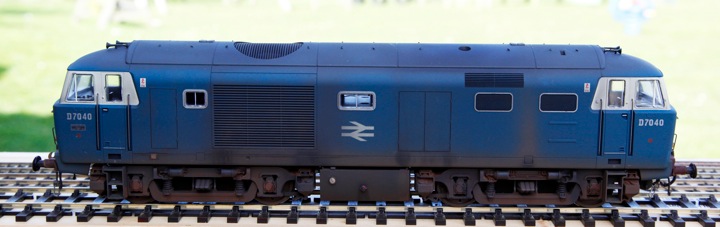 |
| The finished article |
 |
| I think the underframe really comes to life with the weathering techniques I picked up from Model Rail magazine's feature on weathering a Class 26 last summer. |
 |
| Using an airbrush to weather models in this scale is so much easier. |
 |
| MIG weathering pigments and Tensocrom opaque acrylics just add that little bit of authenticity. |
